Tuesday, December 23, 2008

Last steps for PI configuration

So, it's been a long time but now i thought of finishing with the last steps of configuring usage type PI, and in future posts walk you through some simple PI scenarios..


We last configured the RFC Java destinations; moving on...:


Step 7

The next step is to create a HTTP connection in the Java environment required for Process Monitoring Infrastructure .

a. This is done easily by going to Cluster --> Server --> Services --> Destinations in the Visual Administrator tool.
b. In the HTTP node of the Runtime tab create a New destination named "pmistore". (lowercase does matter). You must enter at least the following details :

- the URL : http://[pi_host]:[ABAP_Port]/sap/bc/spi_gate (usually the port is 8000; you can find the port in tcode SMICM under Goto --> Services)
- select Basic Authentication
- username : PIRWBUSER and its password
- Save


Step 8

1. On your Integration Server host, call transaction SXMB_ADM.

2. On the Integration Engine: Administration screen, choose Integration Engine Configuration.

3. Choose Edit and Change Global Configuration Data.
4. In the Global Configuration Data box, select Integration Server as Role of Business System, and leave the other fields empty.
5. Save your settings.


Step 9

I hope you didn't close the Visual Administrator, because now you must go to Cluster --> Server --> Services --> Deploy and after checking the Application checkbox, restart the application com.sap.aii.af.cpa.app to trigger the SLD self-registration of the Central Adapter engine

Step 10

Now we must import PI content; this step isn't covered by the configuration wizard also and i think it is quite useful to know. You need of course an SAP_XI_ADMINISTRATOR or SAP_XI_CONTENT_ORGANIZER role to import / export content for PI.

XI content can be found on the SAP marketplace under Downloads --> Support Packages and Patches --> ESR content (XI content). Files are usually ZIP files and always contain both previous objects and the changes and enhancements delivered in the support package.

a. Download the files and unzip them; the actual export files have the extension .tpz

b. Copy the export files into the import directory for the Integration Repository (\xi\repository_server\import).

c. Open the Integration Builder start page by calling it either from your user menu or with transaction SXMB_IFR, choose Integration Repository, Tools --> Import design objects to import the XI content.

After a successful import, the Integration Builder moves the imported TPZ files into the directory /xi/repository_server/importedFiles.

Step 11

If you have configured corectly PI, then execute transaction SLDCHECK and it should show nothing but green.


============

Saturday, December 20, 2008

PI configuration step error

I discovered a minor problem when configuring manually an SAP system with usage type PI. On the second step of the configuration, Configuring Workflow for BPM, you must execute tcode SWF_XI_CUSTOMIZING. When trying to perform execute for the activity "Schedule Background Job for Deadline Monitoring", the system displays the error message "Error within method CL_SWF_ADM_JOB_FACTORY=>GET_INSTANCE->" . Then, the system does not schedule the relevant job and the status icon displays a red cross. This happens because that activity is obsolete and was not removed from automatic customizing by mistake; so you must :

1. execute transaction SM30

2. maintain the view SWFCTASK.

3. Delete all the rows for "CL_SWF_CST_DEADL_SERVICE_JOB" (usually there are two)

4. Don't forget to save;

Now, in SWF_XI_CUSTOMIZING you should be able to get green crosses everywhere, and move on to the next configuration step...

PS: these instructions are mentioned in SAP Note 1117735

Basis J2EE server problem after installing on x64 systems

I encountered this error recently when i installed NW 7.0 (2004s) on Windows Server 2003 x64 with MSSQL. The system seemed to be working fine, instances were green; but as soon as i tried to open a browser and log on to SLD, i got an error that the Page cannot be found. Surprisingly, when i returned to sapmmc console to check the status, now the J2EE server wasn't green anymore, it suddenly stopped and restarted.

After some digging around on all sorts of forums and checking the logs (dev_dispatcher) i saw that the Java error was returning code 666 (ironic, isn't it :P) and soon discovered that on all SAP installations on 64bit operating systems, you MUST modify the Java Heap size parameters using the J2EE config tool;

The parameters you need to modify for your instance must follow some rules; every information needed is found in SAP Note Number 723909.

Monday, September 15, 2008

SAP XI Configuration (continued)

Let's pick up things from where we left off. The next step is to:

  • Create RFC Destinations in the ABAP environment

1. In the Integration Server host log on and enter transaction SM59.

2. Choose Create.


3. Name of the RFC destination:
INTEGRATION_DIRECTORY_HMI

4. Connection type: H

5. In the Technical Settings tab enter the data:
■ Target Host: host name of the J2EE engine

■ Service No.: HTTP port number (the following naming convention applies: 500 like 50000, if your Java instance is 00)

■ Path Prefix: /dir/CacheRefresh


6. In the Security/Logon tab enter the data:
■ Select Basic Authentication, confirm the popup, and ignore the warning.

■ As logon data enter the client of your Integration Server and the user PIISUSER with the valid password.

Save your entry now, before you switch to next tab, otherwise your entries may be lost. Choose ENTER to go to the next screen.

7. In the Special Options tab:

■ Timeout: 30000

■ HTTP Settings: HTTP Version: HTTP 1.0, Compression: inactive, Compressed Response: No

■ HTTP Cookies: Accept Cookies: Yes (All)

8. Choose Test Connection.

The test has been executed successfully if the response status code is 500 and you find REQID not found in the HTTP body.

9. Save your settings.

  • Creating RFC Destinations in the ABAP and Java Environments
We must now create 4 RFC destinations both in ABAP (SM59) and Java (Visual Administrator).

● AI_RUNTIME_JCOSERVER

Points from the Integration Server to the mapping runtime. The program ID corresponds to the entry under JCo RFC provider for the J2EE Engine (used for the mapping runtime, value mapping, and the exchange profile).


● AI_DIRECTORY_JCOSERVER

Points from the Integration Server to the Integration Builder. The program ID corresponds to the entry under JCo RFC provider for the J2EE Engine (used to refresh the runtime cache).


● LCRSAPRFC

The RFC destination LCRSAPRFC is required for the connection to the Structure linkSystem Landscape Directory (SLD). It is used to read the exchange profile.


● SAPSLDAPI

The RFC destination SAPSLDAPI is required for the connection to the SLD. It is used by the ABAP API.


To maintain the RFC connections in ABAP you must:

1.Log on to your Integration Server host.
2.Call transaction SM59.
3.Choose Create.
4.Enter at least the following:

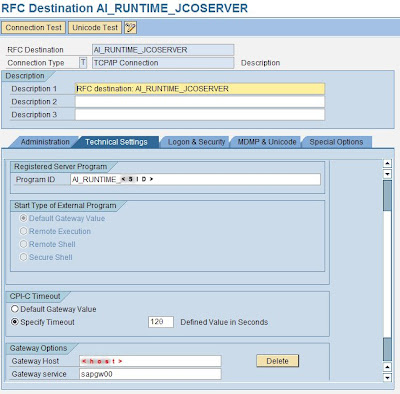
- RFC destination: AI_RUNTIME_JCOSERVER
- Connection type: T
- Description:
5.Choose ENTER.
6.Choose the Technical settings tab and do the following:

a. Select Registered Server Program.

b. In the Program ID field, enter: AI_RUNTIME_[SID], where [SID] is the SAP system ID of your Integration Server host. Use uppercase letters only.

c. Enter Gateway host and Gateway service of your Integration Server host.

To find out the required parameters:
...
i. On the Integration Server host, call transaction SMGW.
ii.Choose Goto --> Parameters --> Display (see entries for gateway hostname and gateway service).


7.Choose the Special Options tab and select the Unicode flag in the Character Width in Target System box.
8.Save your settings.
9.Repeat steps 3 to 8 for the remaining destinations:

- AI_DIRECTORY_JCOSERVER

Program ID: AI_DIRECTORY_[SID], where [SID] is the SAP system ID of your Integration Server host.

- LCRSAPRFC

Program ID: LCRSAPRFC_
[SID], where [SID] is the SAP system ID of your Integration Server host.

- SAPSLDAPI
Program ID: SAPSLDAPI_
[SID], where [SID] is the SAP system ID of your Integration Server host.

10.Leave transaction SM59 open for later tests.


That was the ABAP part. Now let's configure the Destinations for the Java stack.

Perform the following steps:

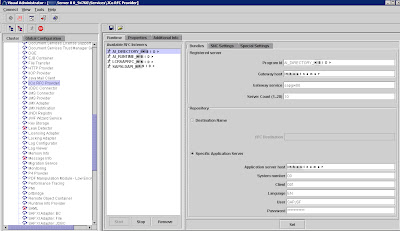
1.On your Integration Server host, start the J2EE Engine Visual Administrator.
2.Choose Cluster --> Server --> Services --> JCo RFC Provider.
3.In the RFC destination section, enter exactly the same program ID and gateway options for AI_RUNTIME_JCOSERVER that you used above. Additionally, set the number of processes to 10.
4.In the Repository section, do the following:
a. Enter the parameters for the Integration Server host: Application Server, System Number, Client, and Language.
b. For User and Password maintain the login parameters for the user SAPJSF.
c. Select the Unicode flag.
5.Choose Set.


6.Repeat steps 3 to 5 for the remaining destinations:

- AI_DIRECTORY_JCOSERVER

Corresponding values from transaction SM59
Number of processes: 10

- LCRSAPRFC

Corresponding values from transaction SM59
Number of processes: 3

- SAPSLDAPI

Corresponding values from transaction SM59
Number of processes: 10

Now it's time to test the RFC Destinations:

After you have maintained all RFC destinations in both the ABAP and Java environments, you can check all the connections above as follows:

1. Call transaction SM59 again.
2. Open the RFC destination.
3. Choose Test Connection. Choose Unicode Test after that. No errors should be displayed.


We still haven't finished with the Configuration. We have 5 more steps :) But we will discuss them finally in a third and last post.

..to be continued..

Friday, September 12, 2008

Post installation configuration SAP XI

I will now describe the configuration steps that are required for setting up the SAP NW with usage type PI (XI).

As i mentioned in the previous post, you can use the wizard-based configuration but i would recommend that at first you should do it manually. But alas, if you decide to use the wizard you must know to do this only on systems that haven't been configured before. If you have modified the system already or upgraded it from an older version, you should do these steps manually.

1. Configuration Wizard

If you want to use the wizard then open the SAP NW Administrator in a browser with the path http://host:httpport/nwa and log on as Administrator.
Then navigate to the Deploy and Change tab, select a task from the list and Start it. Enter the required data and just follow the screens, it's pretty straightforward.

2. Manual Configuration

  • Ok. The first thing you should do is check if some essential sap.com services are started. To do this you must log on to the Visual Administrator tool, go to Cluster --> Server --> Service --> Deploy. In the right frame, select Application.Through the list of deployed services, check if the next services are started:
All services beginning with:
- sap.com/com.sap.aii*
-sap.com/com.sap.lcr*
-
sap.com/com.sap.xi*
And service:
sap.com/com.sap.rprof.remoteProfile

  • Performing automatic customizing
In order to use the Business Process Engine you must perform automatic customizing on the Netweaver Web Application Server (ABAP).
So :
1. Log on with SAP_ALL rights (don't use users DDIC or SAP*).
2. Call transaction SWF_XI_CUSTOMIZING to execute the basic customization. This transaction sets all the required technical settings. The screen Automatic Workflow Customizing will appear.
3. Make sure that the Maintain Runtime Environment node has a green check (not a red cross).
If there is a red cross, do the following:
a. Select the Maintain Runtime Environment node and choose Perform Automatic Workflow Customizing.

The system will now execute the automatic customizing including all sub nodes.

4. Choose Maintain Definition Environment --> Maintain Prefix Numbers.
5. Choose Execute. The Prefix Numbers for Workflow and Organizational Management screen will appear.
6. Choose Display <-> Change to activate the edit mode.
7. In the Available Prefix Numbers for Workflow and Organizational Management box, choose Create.
8. In the dialog box, enter a Prefix number equal to or higher than 900 and choose the Save button.
9. Choose Maintain Definition Environment --> Check Entries from HR Control Tables.
10.Choose Execute. The Consistency Check of Workflow Installation screen appears. The control tables must be complete.

If you encounter any problems, i suggest you execute transaction SE38 and execute report RHTTCP77. Ignore the red cross errors regarding the transport objects PDST or PDWS.After that execute report RSWF_CATID select with the options ABAP Classes and XML Object types selected.

You should be ok now.

  • The next step is to assign application roles to user groups. You do this in the J2EE Visual Administrator. Go to Cluster --> Server --> Services --> SLD Data Supplier. Then click on the Runtime tab which is located in the right frame, then choose Assign Application Roles To User Groups and confirm the dialog.
  • Now we need to maintain a product for the tehnical system and a business system for the Integration Server.

Perform the following steps:
1. On the SLD start page of your SLD host, choose Technical Systems. The Technical Systems page appears.
2. Select Web AS ABAP as type of your technical system.
3. In the table displayed, choose the technical system () that you have created for the Integration Server with transaction RZ70. See the Installation Guide SAP NetWeaver 7.0 at SAP Service Marketplace at service.sap.com/installNW70.
A details screen appears, where you can maintain the technical system.
4. On the Installed Products tab page, choose Add new Product.
5. In the product list, select the product SAP NetWeaver 7.0.
6. Make sure that at least the component SAP BASIS 700 is selected in the software component version list.
7. Don't forget to Save.

  • Maintaining a Business System for the Integration Server
Now we must define a business system with the role of an Integration Server in the SAP System Landscape Directory (SLD).

Perform the following steps:

1. On the SLD start page of your SLD host, choose Business Systems. The Business Systems page appears.
2. Choose New Business System…. The Business System Wizard appears.
3. Select system type Web AS ABAP and choose Next.
4. Select the technical system for your business system by selecting the system () and client of your Integration Server and choose Next.
5. Enter a name for your business system and choose Next. An installed products list appears.
6. If there are products displayed on the left that are not installed on the system, deselect them by deselecting the Installed indicator and choose Next.
7. Select Integration Server as the role of the business system and enter the following in the Pipeline URL field: http://:/sap/xi/engine?type=entry
In this Internet address, and are the ABAP host name and port number of the Integration Server. You can find by logging on to the Integration Server and running transaction SMICM (choose Goto --> Services and check the entry for HTTP).
8. Choose Finish.
9. Make sure that the host name of the Integration Server specified in the SLD matches the name specified in the exchange profile (in section Connections, property com.sap.aii.connect.integrationserver.name). If there is a mismatch, change the name specified in the exchange profile so that it matches the one specified in the SLD.

Remember that if you change the host name of the Integration Server after the installation in either the SLD or the exchange profile, you must adjust it accordingly in the exchange profile or the SLD, respectively.

Ok, we have made the first 5 configuration steps manually. We have another 7 steps to go through. The next ones involve creating RFC destinations in the ABAP and JAVA environments and i will go through all of them but in the next post.

...to be continued...

Thursday, September 11, 2008

Installing SAP Exchange Infrastructure (PI)

After the short description of the SAP XI components it's time to start with how to install and configure the SAP usage type PI (former Exchange Infrastructure).

In the first place you should know that all installation-related guides can be found at http://service.sap.com/instguides. In the left panel you will find SAP NW 7.0 (2004s) version which we will use. There, under Installation you will find the Master Guide that you must read. There are a few steps that must be done before proceeding with the installation.

1. First you check the hardware and software requirements.
2. You need to check the Windows File System (NTFS is a must).
3. You need to check the size of the file cache.
4. You must install the Java Development Kit (JDK). I would recommend version 1.4.2. Also, the installation tool (SAPINST) requires the JRE to function. So, install JDK + JRE.
5. Install your chosen database (Oracle, MSSQL etc). Be sure to check the master guide before installing because for example Microsoft SQL Server 2005 is required to have a certain collation (Unicode collation SQL_Latin1_General_CP850_BIN2) to work with SAP. This collation is not installed by default so you must manually change it in the installation process.
6. Prepare the installation DVDs or download from SAP site.
7. Before you start the installation, make sure to download from the Sun site the Java Cryptographic Extension Policy Archive (JCE_policy) for the JDK version that you installed earlier.
7. When you install a new PI System you can either register the PI System in a local or in a remote System Landscape Directory.


So after the SAPINST has finished installing the SAP PI, you need to make a couple of post-installation steps.

Firstly, you need to map the Security Role to User:

  • Log on to the Visual Administrator of the J2EE engine of the SLD host. You'll find the path to look like this: "X:\usr\sap\\DVEBMGS00\j2ee\admin\go.bat"
  • Choose Cluster --> Server --> Services --> Security Provider.
  • In the Runtime tab, you must choose Policy Configurations and then the column Components, and select the component.
  • Switch to the Security Roles tab to display the assigned nodes.
  • Select role LcrInstanceWriterLD. You should see the user SLDAPIUSER.
  • Use the Edit mode and add user PIAPPLUSER with the same role LcrInstanceWriterLD.
Secondly:
  • Log on to SAP XI System with user DDIC and call the transaction SLDAPICUST. You will see the Maintain SLD Access Data screen.
  • Choose Display --> Change and:
1. Replace the existing SLDAPIUSER with PIAPPLUSER;
2. Make sure your entry is marked as Primary;
3. Save the settings;

Well, now we have performed the post installation steps and we must move on to the configuration steps. There are 2 options to do this: either using the template (which i advice against), and doing the steps manually, which i recommend.

So here we will maintain the configuration steps manually.


..to be continued..

Architecture of SAP NetWeaver Exchange Infrastructure

SAP NetWeaver XI is a runtime environment that assigns the inbound messages to the relevant receivers, and, if applicable, maps them to another structure or protocol.
To do so, SAP NetWeaver XI requires information about how the messages are to be processed. This information is provided by the Integration Repository and Integration Directory, which contain all the design and configuration objects of the interfaces respectively. The System Landscape Directory (SLD) contains information about which systems are connected to SAP NetWeaver XI. The Adapter Engine provides information about the protocols and addresses to be used to access each system. The monitoring tools enable all messages that pass through SAP NetWeaver XI, regardless of their origin, to be monitored centrally.


We will now focus on each of these components one at a time. As you can see in the image above, the base component is the System Landscape Directory (SLD).

To be able to exchange data between systems, all the information about the type of systems and the applications they contain must be available in a central location so that the Integration Server can access it as required. In the case of SAP NetWeaver XI, this central location is known as the System Landscape Directory (SLD). The SLD distinguishes between two kinds of systems: technical systems specify the type of system (SAP, Java, or third-party) and how it can be accessed; business systems specify the role of the system in the system landscape, and which of the software versions provided by the technical system are actually used. In the SLD, each technical system is assigned one or more business systems. In the SAP world, a technical system corresponds to an actual SAP installation, whereas a business system corresponds to a client of an SAP installation.
Consequently, the SLD also contains all software products, software components, and software component versions, which are in turn provided by the technical systems and used by the business systems. The following figure explains this relationship.


Integration Builder
The Integration Builder accesses two storage locations. The Integration Repository provides all the objects that are requiredat design time to describe a system-independent connection. This description is used at configuration time in the Integration Directory to describe the actual communication between two existing systems. One reason for keeping the two phases separate is that if the same process is to take place between multiple systems (for example, between a test system and the equivalent productive systems), you need to describe it only once. It can then be accessed as many times as required at configuration time. Another reason is that SAP NetWeaver XI is currently included in the shipment of a relatively large number of other SAP products. By keeping the design phase and the assignment of the real systems separate, SAP is able to ship default scenarios for these products that customers can then apply to their system landscape.

Defining Processes, Interfaces, and Data Types in the Integration Repository

The next image shows you an overview of which elements are part of the Integration Repository (IR), how they are processed within SAP NetWeaver XI, and how they can be imported or exported.


To be able to describe interfaces and processes, you first need to define the data to be used. You can do this directly in SAP NetWeaver XI by creating your own data types and reusing them in message types. Message interfaces can then access one (asynchronous) or multiple message types (synchronous). However, you can also import these descriptions. From within an SAP system, you can import IDoc or RFC descriptions, which can be made available immediately as inbound and outbound interfaces. You can also import message interfaces in WSDL format and message types in XSD or XSLT format from non-SAP systems.

From these interfaces, one outbound interface (from the perspective of the business system, not from SAP NetWeaver XI) and one inbound interface (also from the perspective of the business system) are connected to each other by a mapping (this is always required when the message types used are not identical). A mapping defines how the structures are to be mapped and, if applicable, which values are to be mapped.

Mappings can also be either created directly in the graphical editor in SAP NetWeaver XI, or imported as Java or ABAP classes, or as XSLT or ABAP-XSLT transformations.

Defining Real Interfaces with Your Partners in the Integration Directory

You use the Integration Directory to define actual scenarios with real business partners. Using a wizard, you can access the scenarios from the Integration Repository so that you need to enter only the system names. You can also design your own scenarios; however, they must reference message interfaces and mappings that already exist in the Integration Repository. The receiver of an inbound message (and any conditions) is specified in the receiver determination; the relevant inbound.
You also need to define how the involved systems communicate with SAP NetWeaver XI. This is achieved using sender communication channels for the sender of the outbound interface, and using receiver communication channels at the receiver of the inbound interface. These communication channels define both the protocol and how a system is to be reached (for example, the RFC destination in RFC communication).


Processing Messages in SAP NetWeaver XI

The receipt of a message always triggers the SAP NetWeaver XI runtime. The information in the Integration Directory is used in the pipeline to determine which business system is the receiver of the message, and which message interface and communication channel is expected. Technical routing in the business system then determines which technical system is concerned. The system also checks whether a mapping is required and executes it, if applicable.


Well, i think this information is enough for this post and we will continue to talk about monitoring the messages from XI and also give some simple scenario example from head to toe in the next posts...

Wednesday, September 10, 2008

What is SAP XI ?

SAP Exchange Infrastructure (SAP XI) is one of the most powerful and widely used parts of SAP NetWeaver. At first glance, it seems pretty simple: SAP XI allows one application to send data to another application.

However, actually doing this job the right way is much harder that just sending a message from one place to another and back again. To solve this problem in a way that makes life easier for developers and provides all of the functions that applications need, SAP has added all sorts of powerful toolkits inside SAP XI.

In a way, SAP XI is a toolkit’s toolkit and is also essential to helping SAP NetWeaver fulfill its potential.

So how does this magical exchange of data happen? Start with the message itself. In SAP XI, the message is usually in XML (eXtensible Markup Language), a flexible format for storing data that can handle almost any kind of structure in a simple way.

SAP XI:

  • Has a way to define XML messages.

  • Stores the descriptions of messages in a repository and keeps track of where they should be sent in a directory.

  • Has the ability to map the fields of one message to another. SAP XI can then route the messages from one place to another or to many others.

  • Contains a special toolkit for building adapters that allows any program to send and receive messages.

SAP XI has a powerful toolkit for Business Process Management (BPM), which allows messages to become part of complex processes. This can help many applications communicate with each other the way that they have to when one business integrates its systems with another.

SAP XI acts like a superhighway: Whenever an application needs to send or receive a message, SAP XI is the road that carries it. SAP XI has on-ramps and off-ramps, and rules that make sure every message is received and read correctly when it reaches its destination.

In this translation of information, what you want is the complex logic of managing the conversation to be in the middle, in some sort of integration hub that transfers messages back and forth. SAP XI is that middle hub that’s designed to manage the complexity of the conversations.


Without XI


With XI


The classic example of reducing integration costs is by using a hub, rather than tying together application systems in a spider web fashion. SAP XI replaces many point-to-point connections with a single connection for each application to such an integration hub. Then if you change something in the landscape, you don’t affect the connection from the application to the hub. Each system retains its independence, whatever happens in the rest of the system landscape, because each system relies on the hub — the integration broker — to take the message to the appropriate application. Thus, you maintain one interface, and your customer order is good to go.

A common use of the central hub’s features is when SAP XI replaces a “fire and forget” purchase order with a monitored interaction. Say you need to send a business partner a purchase order, but because that’s a “fire and forget” kind of communication, it’s as if you’re sending an e-mail — you may know the partner will get the e-mail, but you don’t know when he’ll read it or respond to it.

But with SAP XI, you can use the BPM tool to control timing. You can send a partner a purchase order, but instead of wondering when she will respond, you can have an agreement with her that within 24 hours if you don’t get an answer, you will automatically send the order to another partner. This ensures that processes aren’t unreasonably delayed while an order sits unattended. This policy encourages the partner to create a process to accept, reject, or change the order within 24 hours. Because you are using SAP XI, you know that your processes will keep moving.


<<...in the next post we will discuss more about the comprising parts of XI...>>

SAP Song

You're talking about the new new economy
You tell a lot about your e-business history
You are so proud to be now in the world wide web
But what the hell could be your next important step?

You listen to your broker every night and day
The winning points of our company have nearly blown away
You love your customers you want to keep them
But what the hell you ask yourself is real time CRM

Don’t hesitate don’t worry
You can count on us at all
We’ve got the answer to your questions
together we can make that goo...

SAP is what you need
SAP is the best run
Every one who’s trying us get its e-business done

You are still talking about the global evolution
You try hard to find your business solution
You want the attack you hate the defense
But when the hell you get your business intelligence?

You say you pray steady to your employees
They're working hard until they get them all they need
You love them all you want to keep them
But what the hell you ask yourself is perfect HRM

Don’t hesitate don’t worry
You can count on us today
We can work it out together
We’ll find a better way

SAP is what you need
SAP is what we are
And among the global players
We'll be a super star

SAP is what we need
SAP is what we are
And among the global players
We'll be a super star
And among the global players
We'll be a super stat