Next, i will try to follow the scenario "Integrate XI and BI in SAP NW 2004s using Proxy Communication". For this to happen we must create a Business System in the SLD for BI; Because we already create BS_Integration_Server for client 001 (XI), we must change the BW client from 001 to another client, and then create a BS for it in SLD.
To do this, first we must create new Client. Now this is BASIS work, but i will cover it also in this post, because in my test environment i am also the BASIS guy :P
So, before creating a new client in transaction SCC4, we must first ensure that we will be able to login to it using user SAP* and password 'pass':
- execute RZ10 --> choose your Instance Profile;
- check Extended Maintenance, then choose Display;
 The list with the active parameters of the profile appears. You need to find parameter "login/no_automatic_user_sapstar". If it isn't in the list, you must create it and add value 0 for it. That means that any client that you will create will automatically have enabled user SAP* with default password 'pass'.

- execute transaction SCC4
- choose Change (Caution: table is cross-client)
- click New Entries
- add details for new client
 I have encountered a problem here, but didn't pay attention to it; in the Logical System field, i left it empty, because i haven't created a new logical system. So, this might be the reason for my future errors; so it is probably best to create a logical system in transaction SALE, under Basic Settings --> Logical Systems --> Define logical system, before creating the client in SCC4.
 So, let's assume we left the field blank; we created the new client 400. Now we must copy the existing client 000 on to 400. Now, before moving on you must restart the server. After it has restarted, login with your automatically created SAP* user and 'pass' in client 400 and execute transaction SCCL. Choose target client 400, source client 000 and SAP_CUST for the profile.
You will immediately encounter a problem:
"RFC Destination for client copy in systems with financials basis (FINBASIS) component.The system could not find any suitable RFC destination for processing the client ..."
Don't worry it's easy; just execute the wizard link in the message and it will automatically create RFC destination. Be careful to enter the data correctly; then you can check if it's working by executing SM59, under ABAP connections, open your RFC (probably named FINB_TR_DEST), then do Connection Test, but most importantly under Utilities(M) --> Test --> Authorization Test to make sure that the user and pass you previously entered are correct.
 After that, the client copy should go smoothly.
 *** Now it is the time to create the Logical System for this 400 client in transaction SALE, under Basic Settings as i mentioned above. After creation, execute also the 'Assign Logical System to Client activity', double click the table on your 400 client and enter the Logical system name in the appropriate field.
 First thing to do next is to create at least one user, other than SAP*, with SAP_ALL rights. You will need it later in transaction WE20, but let's not get ahead of ourselves. Now i guess it's time to check if BW is working on our new client; to see this, execute transaction RSA1, BW's administration workbench. You will get an error message saying that you can run only in client 001. That's because you haven't yet disconnected the BW from client 001, and it can only run in ONE client. So, to change it to our 400 client, we must execute transaction SE16 and open up table RSADMINA; execute it, then check the BW row, and search for column BW_MANDT. Modify it to your new client (in my case from 001 to 400). Save the table. Exit the transaction.
Now try to run RSA1 again, if it works congrats, you did it; I, on the other hand encountered an error : "Logical System Name was changed from S01CLNT001; please change it back....." and so on. Probably this happened because i didn't create and assign a logical system name to client 400 immediately after creation. But if you run into this error too then you should read below on how to fix it.
You must execute transaction SE37, then function RSAP_BIW_DISCONNECT; but before we do this, we must first copy the already existing values before we delete them.
Basically, what the disconnect function does, is to delete entries in table RSABSIDOC (in SE16) and so the connection with the source system. So execute SE16 and view the entries in the above mentioned table RSBASIDOC, writing them down on a piece of paper. Afterwards, go back to SE37 and execute function RSAP_BIW_DISCONNECT Sngl Test with the following parameters:
- I_BIW_LOGSYS = [value of SLOGSYS in RSBASIDOC table ]
- I_OLTP_LOGSYS = [value of RLOGSYS in RSBASIDOC table]
- I_FORCE_DELETE = 'x'
After execution, you can check in SE16 table RSBASIDOC and see that it is empty.
Note: the SLOGSYS and RLOGSYS values represent the Logical System name of the initial 001 client (in my case : S01CLNT001). We must change these to our new Logical System Name for client 400 (S01CLNT400).
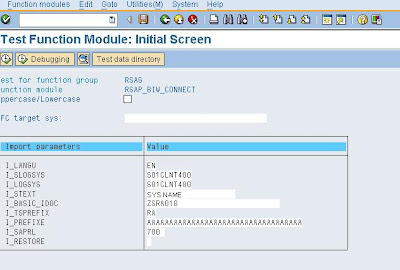
Now, we must execute in SE37 function RSAP_BIW_CONNECT. The following parameters and values must be filled in:
- SLOGSYS: [Logical System Name for client 400]; Ex: S01CLNT400
- RLOGSYS: [Logical System Name for client 400]; Ex: S01CLNT400
- I_STEXT: [name of OLTP system]
- I_BASIC_IDOC : [value of BIDOCTYP in table RSABASIDOC]
- I_TSPREFIX: [value of TSPREFIX in RSBASIDOC]
- I_PREFIXE: [second byte of TSPREFIX repeated 35 times]. Example: If TSPREFIX is 'RA', then second byte is 'A'; so you should enter: 'AAAAAAAAAAAAAAAAAAAAAAAAAAAAAAAAAAA' exactly 35 times.
 Well, then hit F8; in my case it executed and i received an error message:
 "Message No. E0426
Diag: An entry with the key /S01CLNT400/LS/ is to be inserted in table EDPP1...."
The final step to resolve this message and finally finish is to execute transaction WE20 and assign a partner profile of type LS (Logical System). So create a new profile add fill in these values:
- Partner No. : [Logical System name]; Ex.: S01CLNT400
- Partn. Type: LS
- Ty.: US (User)
- Agent: [enter user created earlier other than SAP*]
Don't forget to Save.
Then exit the transaction, execute RSA1 in client 400 in which you should be in already and the Data Warehousing Workbench should appear.

Now BW is connected to client 400 and assigned to logical system S01CLNT400;
That's all about how i changed my BW client; hopefully you won't ran into any errors if you create and assign a logical system name immediately after you create the client; but if you do remember the RSBASIDOC table in SE16 and the RSAP_BIW_DISCONNECT and RSAP_BIW_CONNECT functions.
That being said, see you on my next post. Good luck !